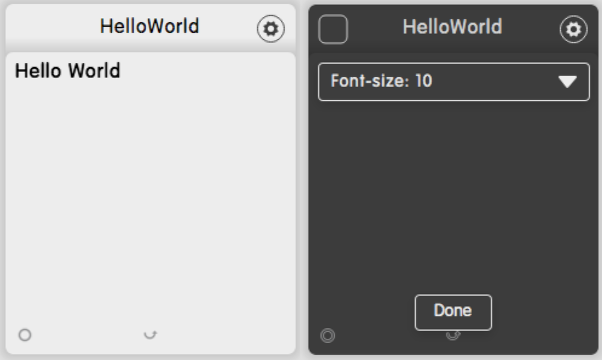
In this section, we will show you how to build your first dizmo. You can write dizmos on Windows, Mac OSX and Linux.
We also assume that you have downloaded and installed dizmoViewer, the environment that will enable you to run dizmos. If you don’t have dizmoViewer and are interested in working with dizmo please drop us an email at contact@dizmo.com.
You need a text editor such vi, nano, sublime text, Textedit, notepad++, Atom.
Start with creating a new directory for all the files of our new dizmo:
$ mkdir helloworld
$ cd helloworldIn the helloworld directory, create a file named Info.plist, then cut and paste the following content into it:
<?xml version="1.0" encoding="UTF-8"?>
    <!DOCTYPE plist PUBLIC "-//Apple//DTD PLIST 1.0//EN" "http://www.apple.com/DTDs/PropertyList-1.0.dtd">
<plist version="1.0">
    <dict>
        <key>BundleDisplayName</key>
        <string>HelloWorld</string>
        <key>BundleIdentifier</key>
        <string>org.example.dizmo.elements.helloworld</string>
        <key>BundleName</key>
        <string>HelloWorld</string>
        <key>BundleShortVersionString</key>
        <string>0.1</string>
        <key>BundleVersion</key>
        <string>0.1</string>
        <key>Height</key>
        <integer>250</integer>
        <key>ApiVersion</key>
        <string>1.3</string>
        <key>MainHTML</key>
        <string>index.html</string>
        <key>ElementsVersion</key>
        <string>1.0</string>
        <key>Width</key>
        <integer>240</integer>
        <key>HiddenDizmo</key>
        <false/>
    </dict>
</plist>
Note the ElementsVersion property: This will load the UI library dizmoElements from dizmoViewer. Please refer to the chapter DizmoElements for a more detailed description.
Next, create a file called index.html:
<!DOCTYPE html>
<html>

 <head>
    <meta http-equiv="content-type" content="text/html; charset=utf-8">
    <!-- Your own stylesheet (do not remove!)-->
    <link rel="stylesheet" type="text/css" href="style.css">
 </head>

 <body>
    <div id="front">
        <div id="display">Hello World</div>
    </div>
    <div id="back">
        <select class="font-size" data-type="dizmo-selectbox">
            <option value="10">Font-size: 10</option>
            <option value="12">Font-size: 12</option>
        </select>
        <div class="done-btn-wrapper">
            <button class="done-btn" data-type="dizmo-button">Done</button>
        </div>
    </div>
    <script type="text/javascript" src="application.js" charset="utf-8"></script>
 </body>

</html>
Note that some elements have a data-type property (e.g dizmo-selectbox), that specifies which dizmo UI element it should represent. Also, we have two DIVs containing the front and back of the dizmo. The ids of the two DIVs should be front and back if you want to have their visibility managed automatically (front hidden, back visible when the dizmo is turned to its back and vice-versa).
Then create the application.js file that will contain the JavaScript code for our dizmo:
function showFront() {
    dizmo.setAttribute('state/front', true);
}

function showBack() {
    // this function will enable the settings button
}

dizmo.onShowBack(function() {
    // this function will be called when state/front is set to false
    dizmo.showBack();
});

dizmo.onShowFront(function() {
    // this function will be called when state/back is set to false
    dizmo.showFront();
});

document.addEventListener('dizmoready', function() {
    DizmoElements('.done-btn').on('click',function() {
        showFront();
    });
});
At last, also create the file style.css that defines the layout:
.done-btn-wrapper {
    position: absolute;
    bottom: 0px;
    left: 0px;
    width: 100%;
    text-align: center;
}
.done-btn {
    margin-bottom: 20px;
}
.font-size {
    width: 98%;
}Compress the directory into a ZIP archive and change it’s extension from .zip to .dzm, so that dizmoViewer will accept it as a valid dizmo.
Note: Should you be working on a Mac, use the following commands to package the directory as .dzm. First, change to the parent directory, then zip and rename the folder of your dizmo in one go:
$ cd ..
$ zip -r helloworld.dzm helloworldDrag and drop your helloworld.dzm file into the dizmoViewer.
